Keeping track of your work
You are probably used to keeping a record of your experimental work in either physical or electronic lab notebooks. These provide a valuable audit trail and form part of the process that makes your research reproducible.
However, keeping track of ones work when developing data analysis scripts present different types of challenges from keeping track of laboratory work.
When developing scripts it is often beneficial to build them up one step at a time, adding functionality as one goes along. However, as scripts become more complex one often accidentally breaks them whilst trying to add more functionality. To make things worse it can often be difficult to remember what changes were introduced since the last working state of the code.
Because this is a problem that software engineers have been faced with for a long time there are now some excellent tools for dealing with it. The solution is to use a version control system. Here we will use Git, one of the most popular version control systems, to keep track of our work. In its most basic form you can think of Git as a tool for providing you with an infinite undo-button.
What is Git?
Git is a version control system. That means that it allows you to track changes made to files over time by taking snapshots. Furthermore it allows you to view differences between snapshots and revert back to previous snapshots. In fact Git can do a lot more than this, but this is all we need to know for this chapter. We will go into more detail on the collaborative aspects of Git in the Collaborating on projects chapter.
Git tracks snapshots of files in what is called a repository. You can have many
Git repositories. On my computer I have a directory named projects that currently
contains around fifty sub-directories representing the projects that I have been
working on recently. Each one of these sub-directories is a separate Git repository.
Git can track some or all of the files in a repository. The files can be
located in the top level directory or in sub-directories. However, Git cannot
track any files that live in parent directories of the base Git repository,
e.g. none of my Git repositories can track files located in the parent
projects directory.
In a Git repository files can be in one of four states: untracked, staged, unmodified and modified. When a file is initially created it is in an untracked state, meaning that it is not yet under version control. To start tracking the file one adds it to Git, and the state of the file then changes to staged. This means that the file is staged to be included in the next snapshot. Multiple files can be in a staged state when one takes a snapshot. To take a snapshot one commits all the files that are in the so called “staging area”. The state of the files then changes from staged to unmodified, see figure Fig. 4.
Any subsequent editing of the files under version control would result in their state changing from unmodified to modified. When one is happy with the edits made one would then add the files to the staging area and their state would change from modified to staged. At that point one is ready to take another snapshot by committing the staged edits. The state of the files then, again, change from staged to unmodified. And the cycle continues (Fig. 4).
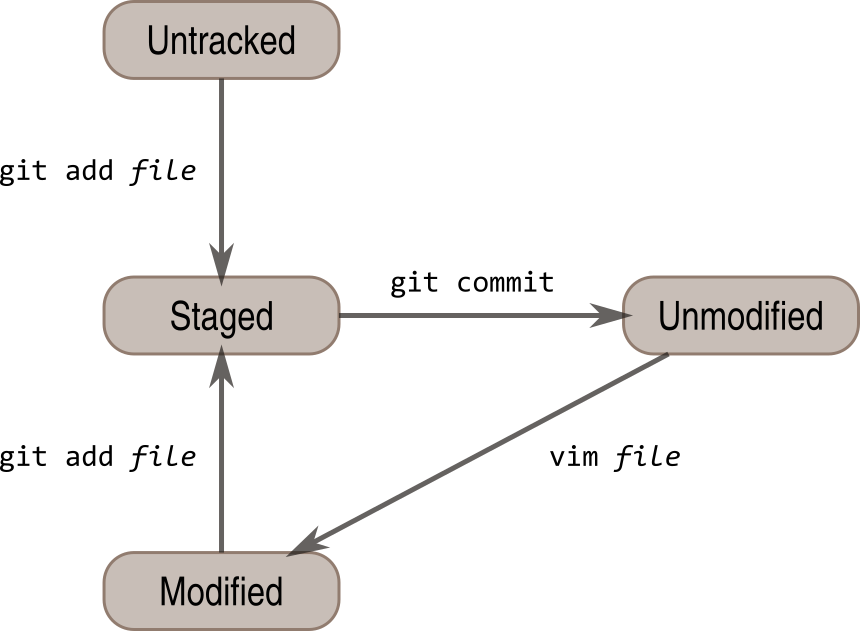
Fig. 4 Diagram illustrating the states a file can have in a Git repository.
The commands git add and git commit are the key components to
creating a snapshot. The vim command symbolises editing the file
using the vim text editor, but any program altering the content of the
file will result in the file being marked as modified by Git.
First time configuration of Git
Git may or may not be installed by default on your system. To find out if it is try running the command below.
$ git --version
If Git is installed you will see output along the lines of the below.
git version 2.6.3
If Git is not installed you will see a command not found message. In this
case you will need to install it. If you do not know how to do this you can
find general instructions on how to install software in
Managing your system.
Although we won’t go into it in this chapter, Git is fundamentally a collaboration tool that helps people work on projects together. This means that we need to give Git some information about us for it to be able to keep track of who has done what, specifically our name and email address.
$ git config --global user.name "Tjelvar Olsson"
$ git config --global user.email "tjelvar@biologistsguide2computing.com"
We will look at the collaboration aspect of git in the Collaborating on projects chapter.
Initialise the project
The first thing to do is to initialise the project using the git init command.
If run with no argument it will set up tracking of files in the current working
directory. If given an argument, such as protein-count, git will
create a new directory with this name and set up tracking of files within it.
git init protein-count
cd protein-count/
Use your editor of choice and create the markdown file README.md and add
the content below to it.
# Protein count

Count the number of proteins of particular species
in a SwissProt FASTA file.
As mentioned, files in a Git repository, the project directory, can be in one
of four states: untracked, unmodified, modified and staged. To view the state
one can use the command git status.
$ git status
The command below produces the output below.
On branch master

Initial commit

Untracked files:
  (use "git add <file>..." to include in what will be committed)

        README.md

nothing added to commit but untracked files present (use "git add" to track)
This tells us that the README.md file is untracked, in other words it is
not yet under version control in Git. However, we would like to track it, so
we add it to the Git repository using the git add command.
$ git add README.md
Let’s see how this affected the status of the repository.
$ git status
On branch master

Initial commit

Changes to be committed:
  (use "git rm --cached <file>..." to unstage)

        new file:   README.md
This stages the README.md file to be committed. To commit the current
snapshot of the project to the Git repository we use the git commit
command.
$ git commit -m "Added readme file."
[master (root-commit) e1dc880] Added readme file.
 1 file changed, 12 insertions(+)
 create mode 100644 README.md
In the above the -m option allows us to specify a commit message on
the command line. The commit message should describe the change that
your are committing. It will be useful when you review the project at
a later date. It also helps communicate your change to any collaborators
working on the same project.
Again, let’s see how this affected the status of the repository.
$ git status
On branch master
nothing to commit, working directory clean
That’s all you need to know to get started with Git. Start by initialising a
project using git init. Then use git add and git commit iteratively
to stage and commit snapshots of your project to version control.
Create a script for downloading the SwissProt FASTA file
We will now convert the command we used to download the SwissProt FASTA file
from First steps towards automation into a script. To add some
organisation we will put this script in a directory named scripts. We will
also create a directory named data for storing the downloaded file. By
specifying more than one argument to the mkdir command one can create
multiple directories.
$ mkdir scripts data
Using your favorite text editor enter the text below into the file
scripts/get_data.bash.
#!/bin/bash

curl --location --output data/uniprot_sprot.fasta.gz http://bit.ly/1l6SAKb
The only difference between this script and the command we entered on the command
line is the first line #!/bin/bash. This is a special construct, called the
shebang, and is used to specify the shell to use when executing the content of the
file.
However, in order to be able to execute the file, i.e. run it as a program, it
needs to have “execute permissions”. One can view the current set of permissions
of a file by using ls -l (mnemonics ls list, -l long).
$ ls -l scripts/get_data.bash
-rw-r--r--  1 olssont  1340193827  88 29 Nov 10:45 scripts/get_data.bash
Note the first ten characters, the first specifies the file type and the
remaining nine relate to the permissions of the file,
see Fig. 5. There are three modes
that can be turned on or off: read (r), write (w) and execute (x).
Furthermore, these can be specified for the owner (u), group (g) and
all users (a or o). The nine characters above state that the owner has
read and write permissions on the file rw-, whereas both the group and
all other users only have permission to read the file r--.
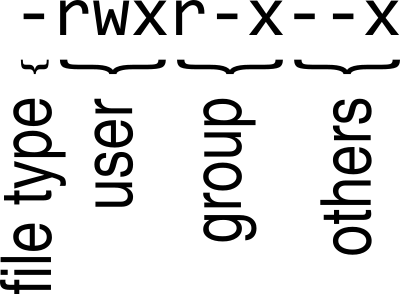
Fig. 5 Figure illustrating how the file permissions string should be interpreted.
In the above the user has read, write and execute permissions. The members
of the group have read and exectue permissions. All other users only have
execute permissions on the file. In this case the file type character -
indicates that the file is a regular/executable file. Other file type
characters include d and l which are used to represent directories
and symbolic links respectively.
Let’s take a moment to expand on the concept of groups in Unix-like operating
systems. A user can be part of several groups. However, a file can only
belong to one group.
For example a PhD student could be part of the groups
famous-project-leader-group and awesome-institute-group. In this
hypothetical scenario the default group for the PhD student is the
famous-project-leader-group. Any files that the student generates would
therefore be assigned the group famous-project-leader-group. If the student
wanted to make a file more widely accessible throughout the institute they
could change the file’s group to awesome-institute-group.
Let us give the file execute permissions. This is achieved using the chmod
command, mnemonic “change file modes”. The chmod command can be invoked in
a number of different ways. Here we use the symbolic mode to specify that the
user and the group (ug) should be given execute permissions (+x) on the
scripts/get_data.bash file.
$ chmod ug+x scripts/get_data.bash
$ ls -l scripts/get_data.bash
-rwxr-xr--  1 olssont  1340193827  88 29 Nov 10:45 scripts/get_data.bash
Let us test the script by running it.
$ ./scripts/get_data.bash
$ ls data/
uniprot_sprot.fasta.gz
The file was downloaded to the data directory, success!
This is a good time to add the script to version control.
$ git add scripts/get_data.bash
$ git commit -m "Added script for downloading SwissProt FASTA file."
[master f80731e] Added script for downloading SwissProt FASTA file.
 1 file changed, 3 insertions(+)
 create mode 100755 scripts/get_data.bash
Let us check the status of our project.
$ git status
On branch master
Untracked files:
  (use "git add <file>..." to include in what will be committed)

        data/

nothing added to commit but untracked files present (use "git add" to track)
Git is telling us that there are files in the data directory that are
currently not being tracked. However, in this project the data directory will
contain files downloaded from a canonical resource and as the download script
is in version control we do not need or want to track the files in this
directory.
It is possible to tell Git to ignore files. Using your text editor of choice
create the file .gitignore and add the content below to it.
data/*
In Bash the * symbol represents a wild card pattern that can match any
string. The * symbol can be used in the same fashion in the .gitignore
file. As such the line we added to our .gitignore file tells Git to ignore
all files in the data directory.
$ git status
On branch master
Untracked files:
  (use "git add <file>..." to include in what will be committed)

        .gitignore

nothing added to commit but untracked files present (use "git add" to track)
Git now ignores the content of the data directory and tells us that the
.gitignore file is untracked. Let us add this file.
$ git add .gitignore
$ git commit -m "Added gitignore file."
$ git status
On branch master
nothing to commit, working directory clean
Improve script for downloading SwissProt FASTA file
However, the current setup has got an issue in terms of reproducibility.
Depending on when the SwissProt FASTA file was downloaded one may obtain
different results. It would therefore be useful to include the date of
access in the file name. This can be achieved using the date command.
$ date
Thu 26 Nov 2015 09:20:32 GMT
The date command can be configured to create custom output formats using
the + symbol followed by a string template specifying the desired format.
In the below %Y, %m and %d will be replaced by the year, month and
day respectively.
$ date +'%Y-%m-%d'
2015-11-26
To get the output of the date command into the file name one can use Bash’s
concept of command substitution. Command substitution makes it possible to
evaluate the result of a command within a string. To see this in action we can
use the echo command, which simply prints out the string that it is given.
$ echo "Today it is $(date +'%d')th"
Today it is 26th
It is time to introduce the concept of a variable.
A variable is basically a means of storing a piece of information using
a descriptive name. In bash one can assign a variable using the equals
character (=). Below we create a variable named PRIBNOV_BOX and
assign it the value TATAAT.
$ PRIBNOV_BOX="TATAAT"
The value of the variable can then be accessed by prefixing
the variable name with the dollar character ($).
$ echo $PRIBNOV_BOX
TATAAT
We now have all the information we need to improve the script. Edit the
script/get_data.bash file to look like the below.
#!/bin/bash

FNAME="data/uniprot_sprot.$(date +'%Y-%m-%d').fasta.gz"
curl --location --output $FNAME http://bit.ly/1l6SAKb
Let’s try running the script.
$ ./scripts/get_data.bash
Now we can check that the script has produced an appropriately named file.
$ ls data/
uniprot_sprot.2015-11-26.fasta.gz uniprot_sprot.fasta.gz
We have added a piece of functionality and have tested that it works as expected.
This is a good time to commit our changes to Git. However, before we do that
let us examine the changes to the project since the last commit
using the git diff command.
$ git diff
diff --git a/scripts/get_data.bash b/scripts/get_data.bash
index d8e9bda..338d82c 100755
--- a/scripts/get_data.bash
+++ b/scripts/get_data.bash
@@ -1,3 +1,4 @@
 #!/bin/bash

-curl --location --output data/uniprot_sprot.fasta.gz http://bit.ly/1l6SAKb
+FNAME="data/uniprot_sprot.$(date +'%Y-%m-%d').fasta.gz"
+curl --location --output $FNAME http://bit.ly/1l6SAKb
The command above tells us that one line has been removed, the one prefixed by a minus sign, and that two lines have been added, the ones prefixed by a plus sign. In fact we have modified one line and added one, but the effect is the same.
Let us now add and commit the changes to Git. We need to do this as working with Git is a cyclical process. You make changes by editing the files, you add the changes that you want to snapshot to the staging area, then you commit the staged changes. At this point the cycle starts all over again Fig. 4.
$ git add scripts/get_data.bash
$ git commit -m "Updated download script to include date in file name."
[master 7512894] Updated download script to include date in file name.
 1 file changed, 2 insertions(+), 1 deletion(-)
By adding the date of download to the file name reproducibility is improved and it means that we can download the file on different dates and ensure that no data is overwritten.
However, it is still possible to accidentally delete or modify the data file.
To overcome this, and further improve reproducibility, it is good practise to
give the data file read-only permissions. This means that the file cannot be
modified or deleted, only read. To do this we will make use of the chmod
command. In this instance we will make use of an absolute mode. Absolute modes
encode the permissions using the numbers 1, 2 and 4 that represent execute, write
and read modes respectively. These numbers can be combined to create any
permission, for example 7 represents read, write and execute permissions and 5
represents read and execute permissions.
| Value | Permission |
|---|---|
| 1 | execute |
| 2 | write |
| 3 | write & execute |
| 4 | read |
| 5 | read & execute |
| 6 | read & write |
| 7 | read & write & execute |
To set the permissions for the owner, group and all other users one simply uses three such numbers. For example to give the owner read and write permissions and the group and all other users read-only permissions one would use the absolute mode 644.
In this instance we want to set the file to read-only for the owner, group and all other users so we will use the absolute mode 444.
#!/bin/bash

FNAME="data/uniprot_sprot.$(date +'%Y-%m-%d').fasta.gz"
curl --location --output $FNAME http://bit.ly/1l6SAKb
chmod 444 $FNAME
If you run the script now you will see that it changes the permissions of the
downloaded file. If you run the script again, on the same day, you will
notice that the it complains that it has not got permissions to write to
the file. This is expected as the curl command is wanting to overwrite
the existing read-only file.
Let’s add these changes to the staging area.
$ git add scripts/get_data.bash
It is good practise to try to make the commit message no more than
50 characters long. Sometimes this is not enough. In these cases you
can create a multi line commit message using a text editor (likely
to be vim by default) by omitting the -m flag.
Let’s try this now.
$ git commit
This should open a text editor with the text below.
# Please enter the commit message for your changes. Lines starting
# with '#' will be ignored, and an empty message aborts the commit.
# On branch master
# Changes to be committed:
#       modified:   scripts/get_data.bash
Use your text editor to edit this message to the below.
Set permissions of data file to read only

The intention of this change is to prevent accidental deletion or
modification of the raw data file.

# Please enter the commit message for your changes. Lines starting
# with '#' will be ignored, and an empty message aborts the commit.
# On branch master
# Changes to be committed:
#       modified:   scripts/get_data.bash
When you save the file you should see the output below in the terminal.
$ git commit
[master ad2a4c5] Set permissions of data file to read only
 1 file changed, 1 insertion(+)
Create script for counting the number of proteins in a genome
Now that we have a script for downloading the SwissProt FASTA file let us convert what we learnt in First steps towards automation into a script for counting the number of proteins for a particular species.
Add the lines below to the file scripts/protein_count.bash.
#!/bin/bash

gunzip -c data/uniprot_sprot.fasta.gz | grep 'OS=Homo sapiens' \
| cut -d '|' -f 2 | wc -l
Make the file executable and test the script.
$ chmod +x scripts/protein_count.bash
$ ./scripts/protein_count.bash
   20194
At the moment the path to the data file and the species are hard coded into the
script. It would be nice if we could turn these two parameters into command
line arguments. We can do this using the special variables $1 and $2 that
represent the first and second command line arguments, respectively.
#!/bin/bash

DATA_FILE_PATH=$1
SPECIES=$2
echo "Input file: $DATA_FILE_PATH"
echo "Species: $SPECIES"

gunzip -c $DATA_FILE_PATH | grep "OS=$SPECIES" \
| cut -d '|' -f 2 | wc -l
Warning
Bash makes a distinction between single and double quotes. To expand
variables one needs to use double quotes. If not one will get the
literal value of the string within the single quotes. For example,
the command echo 'Species: $SPECIES' would print the literal
string Species: $SPECIES.
$ SPECIES=H.sapiens
$ echo "Species: $SPECIES"
Species: H.sapiens
$ echo 'Species: $SPECIES'
Species: $SPECIES
This is a good point to test if things are working as expected.
$ ./scripts/protein_count.bash data/uniprot_sprot.2015-11-26.fasta.gz "Homo sapiens"
Input file: data/uniprot_sprot.2015-11-26.fasta.gz
Species: Homo sapiens
   20194
Success! Let us add and commit the script to Git.
$ git add scripts/protein_count.bash
$ git commit -m "Added script for counting the numbers of proteins."
[master b9de9bc] Added script for counting the numbers of proteins.
 1 file changed, 9 insertions(+)
 create mode 100755 scripts/protein_count.bash
More useful git commands
We’ve covered a lot of ground in this chapter. Can you remember everything that
we did and the motivation behind each individual step? If not, that is okay,
we can use Git to remind us using the git log command.
$ git log --oneline
b9de9bc Added script for counting the numbers of proteins.
a672257 Added command to set permissions of data file to read only.
7512894 Updated download script to include date in file name.
6c6f65b Added gitignore file.
f80731e Added script for downloading SwissProt FASTA file.
e1dc880 Added readme file.
Note that the comments above give a decent description of what was done. However,
it would have been useful to include more information about the motive behind some
changes. If one does not make use of the -m argument when using git commit
one can use the default text editor to write a more comprehensive commit message.
For example, a more informative commit message for commit a672257 could have
looked something along the lines of:
Added command to set permissions of data file to read only.

The intention of this change is to prevent accidental deletion or
modification of the raw data file.
Another useful feature of Git is that it allows us to inspect the changes
between commits using the git diff command. For
example to understand what changed in commit a672257 we can compare it to
the previous commit 7512894.
$ git diff 7512894 a672257
diff --git a/scripts/get_data.bash b/scripts/get_data.bash
index 338d82c..0bbc17b 100755
--- a/scripts/get_data.bash
+++ b/scripts/get_data.bash
@@ -2,3 +2,4 @@

 FNAME="data/uniprot_sprot.$(date +'%Y-%m-%d').fasta.gz"
 curl --location --output $FNAME http://bit.ly/1l6SAKb
+chmod 444 $FNAME
In the above we can see that we added the line
chmod 444 $FNAME to the scripts/get_data.bash file.
Key concepts
- When working with files it is often desirable to be able to track changes
- When programming it is particularly useful to be able to save working states of the code
- This gives one the opportunity to roll back to a previously working state if things go wrong
- Git is a powerful version control system
- To get started with Git one only needs to get familiar with a handful of commands
- Use
git initto initialise a Git repository - Use
git add file-to-addto start tracking a file in Git - Use
git commit -m "your summary message here"to record a snapshot in Git - The overhead of using Git whilst programming is minimal
- The benefits of using Git are great
- Start using Git in your day-to-day work right now!
- On Unix-like systems files have write, read and execute permissions that can be turned on and off
- By making a file executable it can be run as an independent program
- By giving raw data files read only permissions one can ensure that they are not accidentally modified or deleted